Friday, November 28, 2014

SOQL Query Editor as Chrome Extension

I as a developer always need to query Salesforce.com from developer console. However I feel its quite slow.

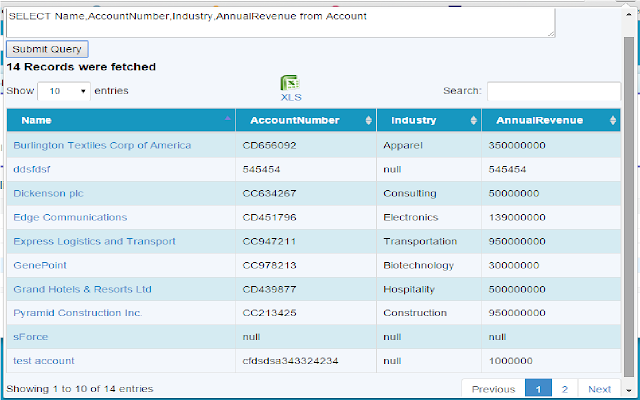
This tool allows you to query right from your chrome extension and show results beautifully. And best part, you can download results in excel :)

Do try this - https://chrome.google.com/webstore/detail/salesforce-soql-query-edi/fcbnphbbaaommndlpdaldnfejndammcc


Friday, February 15, 2013

Creating Model dialog using Visual force

Below is the example to add a model dialog in you visual force page. This dialog can be rendered conditionally. On displaying this dialog, the rest of the visual force page freezes and user cannot click anywhere else on the page. 

Step 1– Create a model component

<apex:component layout="block">
    <apex:attribute name="id" type="string" required="true" description="The id of the dialog"/>
    <apex:attribute name="visible" type="boolean" description="Whether the dialog is visible or not"/>
    <apex:attribute name="bgcolor" type="string" default="white" description="Background color of the dialog"/>
    <apex:attribute name="border" type="string" default="2" description="Width of the dialog border in px"/>
    <apex:attribute name="width" type="string" default="80%" description="Width of the dialog"/>
    <apex:attribute name="height" type="string" default="80%" description="Height of the dialog"/>
    <apex:attribute name="top" type="string" default="10%" description="Top of the dialog"/>
    <apex:attribute name="left" type="string" default="10%" description="Left of the dialog"/>
    <apex:attribute name="overflow" type="string" default="visible" description="Overflow behaviour i.e. scroll/auto/hidden"/>

    <apex:outputPanel >
        <apex:outputPanel styleClass="{!id}dialogBackground" layout="block" rendered="{!visible}" />
        <apex:outputPanel styleClass="{!id}dialogStyle" layout="block" rendered="{!visible}" >      
            <apex:componentBody />
        </apex:outputPanel>
    </apex:outputPanel>
   
    <style type="text/css">
        .{!id}dialogStyle
        {
            background-color: {!bgcolor};
            border-width: {!border}px;
            border-style: solid;
            z-index: 9999;
            padding:10px;
            position: fixed;
            overflow: {!overflow};
            width: {!width};
            height: {!height};
            left: {!left};
            top: {!top};
        }
        .{!id}dialogBackground
        {
            background-color:black;
            opacity: 0.20;
            filter: alpha(opacity = 20);
            position: absolute;
            width: 100%;
            height: 100%;
            top: 0;
            left: 0;
            z-index: 9998;
        }
    </style>
</apex:component> 


Step 2– Add this component in Visual force page where you want to add a model dialog.

<c:ModalDialog id="myModelDialog" visible="{!displayModelDialog}" border="5" width="80%" height="80%" overflow="auto" left="10%" top="10%">
         <!-- Here you can add body of the model dialog -->
         <h1> This is your model dialog <h1>

</c:ModalDialog>

Wednesday, February 13, 2013

Visualforce popup scrollbar issue for Mozilla

Did you ever try to open up popup window from visualforce using javascript? Something like

window.open('/apex/ContactDetail?id=' + conId,'','location=no,resizable=no,toolbar=no,status=no,menubar=no');

The above code works for all browsers other than new versions of Mozilla Firefox. You need to add extra tag in the method -

"scrollbars=yes"

So the method will be -

window.open('/apex/ContactDetail?id=' + conId,'','location=no,resizable=no,toolbar=no,status=no,menubar=no,scrollbars=yes');

Date Picker in Visual force

Below is the example to add to a Date Picker on <apex:inputText> for the Date/ String fields in visual force:

<apex:inputText label="Start Date" value="{!dateVariable}" onfocus="DatePicker.pickDate(false, this, false);"/>

Here 'dateVariable' is a variable being referred from controller.

Tuesday, February 12, 2013

Salesforce.com known issues

The new Salesforce.com release has a bunch of knowns issues which can be tracked here -

http://success.salesforce.com/issues_index

Thursday, October 25, 2012

Enhanced list views on a Visualforce page

Enhanced lists are used when you want to display a specific list view for a standard or custom object, rather than having all list views available for the user to select.
Step 1 – Create the list view
Go to the standard or custom object and click on the Create New View next to the Go button. Create the view and click on Save. When the page has reloaded, you will notice in the url a 15 digit id has been created for your view. Copy or make a note of the id.


Step 2 – Add code to your visualforce page
Add the following bit of code to your visualforce page, replacing the listid with your id:
<apex:enhancedlist type=”Lead” height=”730″ customizable=”false” rowsPerPage=”25″ Listid=”00B30000007wesH” />
Change customizable to equal true if you want your users to be able to edit the filters on the view. Once saved, you should find your visualforce page displays an enhanced list similar in appearance to the image below.

Change Password using apex code

setPasswordID userID
String password
VoidSets the password for the specified user. When the user logs in with this password, they are not prompted to create a new password. Use resetPassword if you want the user to go through the reset process and create their own password.
Warning
Be careful with this method, and do not expose this functionality to end-users.

e.g. System.setPassword('006A123ahjklkk','password123');
 

Hide Salesforce Logo

You can hide the logo from top using the javascript below.


<script language="JavaScript">try{var pa=document.getElementById("phHeaderLogoImage"); pa.style.display = "none";}catch(err){alert('There was an error on this webpage='+err.description);}</script>


You can either use it in visualforce page or add it in homepage components.

Check if inputTextField contains numbers only

Many times you want to check if the inputText contains numbers of decimals only e.g. getting amount in input.


public boolean isValidNumber(String inputNumber){
     Pattern p = Pattern.compile('\\d+(\\.\\d+)?');
     Matcher m =p.matcher(inputNumber);
     return m.Matches();
}

The above method return true if it is a valid number else return false.

Saturday, April 28, 2012

Copy related list from Lead to Account/Contact/Opportunity


There is a salesforce limitation that when a Lead is converted to Account, all the related objects records are lost. E.g. for a Lead, there is a related object named products in which a lead is interested. So for a lead, we can add multiple products in the Lead related list. But when we convert lead to Account, all the products related to Lead are gone!!

So for this, I have written a small code which explains how using a small trigger and few fields, we can retain the products by linking them to account, opportunities and contact. 

I have used a general term CustomObject__c(replace it with you real related object name).

Step 1)For each custom object related to Lead we need to introduce 3 fields.
  -Account__c
  -Contact__c
  -Opportunity__c

Step 2) Write a trigger on before update event on Lead viz. LeadBeforeUpdate
trigger LeadBeforeUpdate on Lead (before update) {
//This trigger will associate a Custom Object record with the new contact and account when Lead is converted
//The Custom Object is associated to an opportunity only if an opportunity record exist on the Lead.
   
    Set<Id> leadIds = new Set<Id>();
    Map<Id,Id> LeadIdContactId = new Map<Id,Id>();
    Map<Id,Id> LeadIdAccountId = new Map<Id,Id>();
    Map<Id,Id> LeadIdOpportunityId = new Map<Id,Id>();


    for (Integer i = 0; i < Trigger.new.size(); i++){
        if (Trigger.new[i].IsConverted == true && Trigger.old[i].isConverted == false){
             leadIds.add(Trigger.new[i].id);
             LeadIdContactId.put(Trigger.new[i].id,Trigger.new[i].ConvertedContactId);
             LeadIdAccountId.put(Trigger.new[i].id,Trigger.new[i].ConvertedAccountId);
             LeadIdOpportunityId.put(Trigger.new[i].id,Trigger.new[i].ConvertedOpportunityId);


        }
    }
   
    //Create a list of CustomObject__c to be updated
    List<CustomObject__c> CustomObjectsToUpdate = new List<CustomObject__c>();
       
           
    List<CustomObject__c> customObjectEntries = [select Contact__c, Opportunity__c, Account__c, Lead__c from CustomObject__c where lead__c in :leadIds];       
   

    for (Lead lead : [select id,ConvertedContactId,ConvertedOpportunityId,ConvertedAccountId from Lead where id in: leadIds])  {
             for (CustomObject__c CustomObject : customObjectEntries) {
                if (CustomObject.Lead__c == lead.Id) {
                    CustomObject.contact__c = LeadIdContactId.get(lead.id);
                    CustomObject.opportunity__c = LeadIdOpportunityId.get(lead.id);
                    CustomObject.account__c = LeadIdAccountId.get(lead.id);
                    CustomObjectsToUpdate.add(CustomObject);
                 }
            }
     }

     if(CustomObjectsToUpdate.size()>0)
         update CustomObjectsToUpdate;
      
} //End of trigger


Note: This trigger will work for multiple records to be copied and is bulk efficient.
Wednesday, May 18, 2011

Salesforce - Get the list of all related objects from an object and their particular records

Solution : Lets get the records of all objects which are related to Account


List<Schema.SObjectType> childList = new List<Schema.SObjectType>();
Schema.DescribeSObjectResult R = Account.SObjectType.getDescribe();
//Create a list of child objects schema
for(Schema.ChildRelationship C : R.getChildRelationships()){
if(C.getRelationshipName()!=null && C.getRelationshipName().contains('__r')){
Schema.SObjectType child = C.getChildSObject();
System.debug('field****'+C.getField());
System.debug('field describe****'+C.getField().getDescribe());
System.debug('child****'+child);
childList.add(child);
}
}


//Querying all records
for(Schema.SObjectType objectToQuery : childList){
//Create dynamic query
String soqlQuery = 'SELECT Id,Name FROM '+objectToQuery;
System.debug('soqlQuery****'+soqlQuery);

//Execute query
List<SObject> results =  Database.query(soqlQuery);
System.debug('results****'+results);
} 

Salesforce – Get the Record Type Id of any object with out querying it in Trigger or Apex Class


Solution Approach – We need to use describe SObject for this.
Sample Code  -
        //To get the record Type Id for Account – Record Type Name is “Person Account”
                
                    //Get all the Record Types of Account and store it in a map.
    Map <String,Schema.RecordTypeInfo> recordTypes =        Account.sObjectType.getDescribe().getRecordTypeInfosByName();
 
     //Get the record type id of from the Map based on the Name
    Id RecTypeId = recordTypes.get('Person Account').getRecordTypeId());

Salesforce - Displaying number of characters remaining on 'Text Area Field'


Solution – We need java script to implement
Java Script:  
 function size(fvalue, size, divid) {
       var input_field = document.getElementById(fvalue);
       var msg_count = document.getElementById(divid);
       var char_reamining = '0';
       var char_entered = input_field.value.length;  
       if(char_entered == 0){
        msg_count.innerHTML = '';
        msg_count.style.background = '#F7F7F7';
       }else {
       if(char_entered <= size){    
         char_reamining = size - char_entered;
         msg_count.innerHTML = char_reamining+ ' remaining';
         msg_count.style.background = 'yellow';
        }else{
          msg_count.innerHTML = char_reamining + ' remaining';
          msg_count.style.background = 'yellow';
          input_field.value = input_field.value.substring(0,size);   
      } } }

  VF Code:  
   <div id="msg" class="ErrorMessageClass">
   </div>
    <apex:inputField value="{!Case.Problem_Description__c}" style="width:900px" onkeyup="javascript:size('{!$Component.formId:pgBlockId:pbs1:tdescription}',10000,'msg');" id="tdescription" />

We are passing the id of custom field in function size as first parameter and as second parameter we are passing size of the custom field i.e. In above case we are passing the size as 10000 so at the point of first character it displays the message 9999 characters remaining and so on...and it doesn't allow to enter more than 10000 characters, as third parameter we are passing the id of div where we need to display the message.

Salesforce - Translate field values


Solution – We can make use of toLabel(object.field) method while querying that field and assign the value. This facilitates to copy the translated value to be copied instead of the master value.

    Sample Code: To retrieve the account records depending on the translated picklist value HeadQuarterCountry = Bengalooru and copy the translated value to some other field. 

            Account acc = [SELECT Id, Name, Region__c, toLabel(HeadQuarterCountry__c) from Account WHERE toLabel(HeadQuarterCountry__c) ='Bengalooru' limit 1;];
            acc.Region__c = acc.HeadQuarterCountry__c; // the value "Bengalooru" will be copied to region instead of master value "Bangalore"          

Salesforce - To get the information about an object record which is sent for the approval


Solution – We can make use of ProcessInstance standard object which can be queried to get the end to end approval process of the record. The related child objects of the ProcessInstance can be used to get more information,
ProcessInstanceStep (child relationship name - "Steps") - Represents one step in an approval process (ProcessInstance).
ProcessInstanceWorkitem (child relationship name - "Workitems") - Represents a user's pending approval request.
ProcessInstanceHistory (child relationship name - "StepsAndWorkitems") - This read-only object shows all steps and pending approval requests associated with an approval process (ProcessInstance). You cannot query on this read only object instead you can query ProcessInstanceHistory by including it in a nested query on the parent ProcessInstance object.
Sample Code: The following code retrieves those submitted case records which needs the logged in user approval

 // Query the list of cases where in the Branch Manager is the logged in user
List<Case> userCaseList = [select Id, casenumber, company_name__c, Type,OwnerId, Status  from Case where Branch_Manager__c = :loggedUser];

// Query those submitted cases which needs the logged in user approval 
List<ProcessInstance> caseApprovals =[SELECT Id,TargetObjectId,
   (SELECT Id, ActorId, StepStatus, Comments, IsPending FROM StepsAndWorkitems where IsPending = True)
FROM ProcessInstance  where TargetObjectId in :userCaseList];


To display the HelpText for a field in visualforce


Solution: We can make use of “inlineHelpText” to display the helptext of a field in visualforce

Sample Code: To display the Help Text for Account Industry field,
                    <apex:outputText value=” {!$ObjectType.Account.Fields.Industry.inlineHelpText}"/>

Salesforce - Display the History related lists in visualforce


To display the Account History Related lists,
<apex:page standardController=”Accounts”>
<!—Displays Accounts History Related lists -- >
<apex:dataTable value="{!Account.histories}" var="accountHistory" width="100%">
                 <!—Displays Created Date of the Field History -- >
                <apex:column>
                                <apex:facet name="header">Date</apex:facet>
                                <apex:outputText value="{0,date,MM/dd/yyyy HH:mm }">
                                                <apex:param value="{!accountHistory.createddate}" />
                                </apex:outputText>
               </apex:column>
              <!—Displays the corresponding field -- >
              <apex:column >
                 <apex:facet name="header">Field</apex:facet>
                                 <b> <apex:outputText  value="{!IF(CONTAINS(accountHistory.field,'__c'),LEFT(accountHistory.field, LEN(accountHistory.field) -3),accountHistory.field)}"/></b>
            </apex:column>
            <!—Displays Edited By User-- >                        
            <apex:column >
                <apex:facet name="header">Edited By</apex:facet>
                <apex:outputText value="{!accountHistory.createdby.name}"/>
            </apex:column>
            <!—Displays Old value of the field -- >
            <apex:column >
                <apex:facet name="header">Old Value</apex:facet>
                <apex:outputText value="{!accountHistory.oldvalue}"/>
            </apex:column>
            <!—Displays New Value of the field -- >
            <apex:column >
                <apex:facet name="header">New Value</apex:facet>
                <apex:outputText value="{!accountHistory.newvalue}"/>
            </apex:column>
        </apex:datatable>
    </apex:pageblock>   
</apex:page>

Security Health Check App


Developed by the salesforce.com information security team, the Security Health Check application performs a quick review of your security-related settings and makes recommendations for improvement. The health check provides a numeric score and tracks your overall security posture over time.

Scan your Force.com developed code for potential security issues.


To generate Google Charts (images) in Visual force-PDF


To enable the Images you have to unblock the callout from apex code. To make a callout from apex code you have to specify the end point in the Remote Site Settings as following,

Setup -> Administration Setup -> Security Controls -> Remote Site Settings -> New Remote Site.  

1. Remote Site Name: A name used to refer to the Remote Site Settings.
2. Remote Site URL: A URL of remote site. For example, to enable Google charts:
3. Disable Protocol Security: Check the Checkbox (As the PDF renderer is a code on the org
     making the request and as such gets denied access if you've not expressly allowed it).
4. Description: An optional description of the Remote Site Setting.
5. Active: Check the Checkbox (By default it is checked to make the settings active).

Salesforce - Increase Year Range of Standard Salesforce Datepicker shown

1. Create a narrow home page component and copy the below html code.
2. Add the home page component to home page layout.
3. Done

Component Code

<script language="javascript">
function addoption(selectobj,txt,val){ 
var optn = document.createElement("OPTION"); 
optn.text = txt; 
optn.value = val; 
selectobj.options.add(optn); 
}

var oldwinload = window.onload;
window.onload = function() {  
if (oldwinload) {    
 oldwinload();  
}  
var obj = document.getElementById("calYearPicker"); 
if(obj!=null){  
var d = new Date();
var curYear = d.getFullYear() + 6;
for(var i=curYear;i<2030;i++) { 
 addoption(obj,i,i);  
}
 }
}

</script>